
In this blog, we are going to create a simple application of the spring framework using eclipse IDE. Let’s see the simple steps to develop the spring application in Eclipse IDE.
1. Create a new maven project
2. Add spring dependencies in maven project : spring core , spring context
3. Creating beans-java pojo
4. Creating configuration file config.xml and Use Dependency Injection : Setter Injection
5. Main class : which can pull the object and use
Steps to create spring application in Eclipse IDE
Let’s see the 5 simple steps to create the first spring application using eclipse IDE.
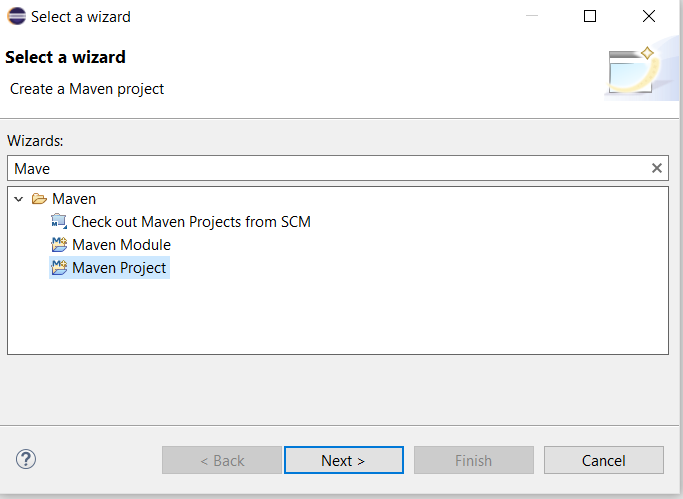
1) Create the Maven Spring Project
Go to File menu – New – Other – Search for “Maven”.
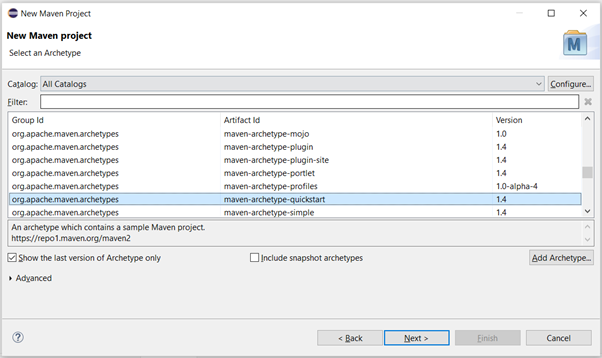
Now click Next and then select “maven-archtype-quickstart” as Artifact Id
After that just enter Group Id and Artifact Id (which is Name of your project)
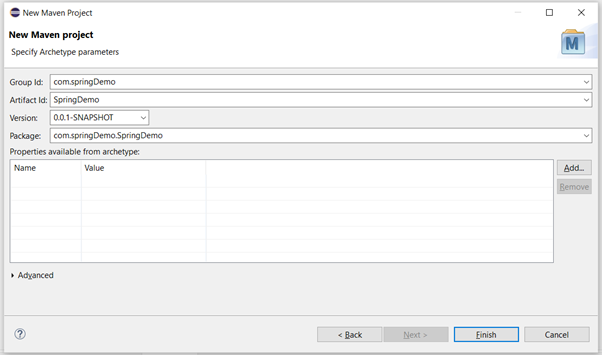
After entering all the details click on finish and your project will be created.
2) Create Dependencies
For our basic application, we need to add two dependencies which are basically “Spring Core” and “Spring Context” in the pom.xml file inside the <dependencies> tag.
For instance,You can search over the web where you can find the code to add dependencies. Similarly I have added these dependencies in our project.
However you can use these dependencies in your application keeping in mind that their version should be same else it will throw an error.
<!-- https://mvnrepository.com/artifact/org.springframework/spring-core -->
<dependency>
    <groupId>org.springframework</groupId>
    <artifactId>spring-core</artifactId>
    <version>5.2.16.RELEASE</version>
</dependency>
<!-- https://mvnrepository.com/artifact/org.springframework/spring-context -->
<dependency>
    <groupId>org.springframework</groupId>
    <artifactId>spring-context</artifactId>
    <version>5.2.16.RELEASE</version>
</dependency>
3) Create Bean Class (POJO)
Create a new class in your application that acts as Bean class (containing getter, setter methods, Constructors and toString() method) . In other words Bean class is also referred as Pojo which is Plain Old Java Object.
Therefore you can find Pojo in place of bean classes at many places.
package com.springDemo.SpringDemo;

public class Student {

	private int id;
	private String name;

	public int getId()
	{
		return id;
	}
	public void setId()
	{
		this.id=id;
	}
	public String getName()
	{
		return name;
	}
	public void setName()
	{
		this.name=name;
	}
	public Student(int id , String name)
	{
		super();
		this.id=id;
		this.name=name;
	}
	@Override
	public String toString() {
		return "Student [id=" + id + ", name=" + name + "]";
	}
}
4) Create Configuration file (config.xml)
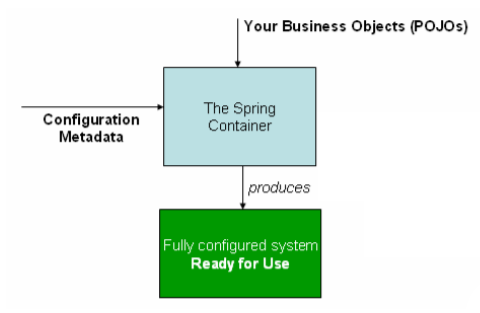
Configuration metadata
Below diagram shows, the Spring IoC container consumes a form of configuration metadata;
this configuration metadata represents how you as an application developer tell the Spring container to
instantiate, configure, and assemble the objects in your application.
The following example shows the basic structure of XML-based configuration metadata:
<?xml version="1.0" encoding="UTF-8"?>

<beans xmlns="http://www.springframework.org/schema/beans"
 xmlns:xsi="http://www.w3.org/2001/XMLSchema-instance"
 xsi:schemaLocation="http://www.springframework.org/schema/beans
 http://www.springframework.org/schema/beans/spring-beans.xsd">

 <bean id="..." class="...">
 <!-- collaborators and configuration for this bean go here -->
 </bean>
 <bean id="..." class="...">
 <!-- collaborators and configuration for this bean go here -->
 </bean>
 <!-- more bean definitions go here -->

</beans>
Above is just a basic structure that how metadata is configured and below is an actual example used where we defined the beans metadata and also used setter injection for creating dependency.
Basically, there are three ways by which you can use setter injection :
- Conventional Method : By defining Property and Value tag seperately
<?xml version="1.0" encoding="UTF-8"?>
<beans xmlns="http://www.springframework.org/schema/beans"
	xmlns:xsi="http://www.w3.org/2001/XMLSchema-instance" xmlns:context="http://www.springframework.org/schema/context"
	xmlns:p="http://www.springframework.org/schema/p"
	xsi:schemaLocation="http://www.springframework.org/schema/beans
    http://www.springframework.org/schema/beans/spring-beans.xsd
    http://www.springframework.org/schema/context
    http://www.springframework.org/schema/context/spring-context.xsd">


      <!--This is our beans meta data and We use Setter Injection here  -->

    <bean class ="com.com.springDemo.SpringDemo.Student" name ="student1">

    <property name="id">
    	<value>123</value>
    </property>

    <property name="Sname">
    	<value>"Technoname"</value>
    </property>

    </bean>


 </beans>
2 . By Defining property and value tag in a single tag
<?xml version="1.0" encoding="UTF-8"?>
<beans xmlns="http://www.springframework.org/schema/beans"
	xmlns:xsi="http://www.w3.org/2001/XMLSchema-instance" xmlns:context="http://www.springframework.org/schema/context"
	xmlns:p="http://www.springframework.org/schema/p"
	xsi:schemaLocation="http://www.springframework.org/schema/beans
    http://www.springframework.org/schema/beans/spring-beans.xsd
    http://www.springframework.org/schema/context
    http://www.springframework.org/schema/context/spring-context.xsd">

      <!--This is our beans meta data and We use Setter Injection here  -->


    <bean class ="com.springDemo.SpringDemo.Student" name ="student1">
    <property name="id" value= "123" />
    <property name="Sname"  value= "Technoname" />
    </bean>

 </beans>
3 . By Using P Schema:
It is a smarter way to work as it requires only a few lines of code is required that simply means we can define bean class, set property and value in a single line of code.
However, in order to use P schema, we have to use the below metadata in config.xml
xmlns:p=”http://www.springframework.org/schema/p”
Below is the example where we used P Schema
<?xml version="1.0" encoding="UTF-8"?>
<beans xmlns="http://www.springframework.org/schema/beans"
	xmlns:xsi="http://www.w3.org/2001/XMLSchema-instance"    xmlns:context="http://www.springframework.org/schema/context"
	xmlns:p="http://www.springframework.org/schema/p"
	xsi:schemaLocation="http://www.springframework.org/schema/beans
    http://www.springframework.org/schema/beans/spring-beans.xsd
    http://www.springframework.org/schema/context
    http://www.springframework.org/schema/context/spring-context.xsd">


      <!--This is our beans meta data and We use Setter Injection here  -->

   <bean class ="com.springDemo.SpringDemo.Student" name ="student1" p:id = "123" p:Sname ="Technoname" />

 </beans>
5) Creating Main class
The interface org.springframework.context.ApplicationContext represents the Spring IoC
container which is responsible for instantiating, configuring, and assembling the aforementioned beans.
The container gets its instructions on what objects to instantiate, configure, and assemble by reading
configuration metadata.
The configuration metadata is represented in XML, Java annotations, or Java
code. It allows you to express the objects that compose your application and the rich interdependencies
between such objects
Instantiating a container
Instantiating a Spring IoC container is straightforward. The location path or paths supplied to an
ApplicationContext constructor are actually resource strings that allow the container to load
configuration metadata from a variety of external resources such as the local file system, from the Java
CLASSPATH, and so on.
ApplicationContext context =
 new ClassPathXmlApplicationContext(new String[] {"services.xml", "daos.xml"});
So we will use ApplicationContext which is IOC Container for creating object of Student class in Main class :
package com.springDemo.SpringDemo;

import org.springframework.context.ApplicationContext;
import org.springframework.context.support.ClassPathXmlApplicationContext;

public class AppTest
{
   public static void main(String[] args)
   {
	ApplicationContext context = new ClassPathXmlApplicationContext("config.xml");
	Student st=(Student)context.getBean("student1");
	System.out.println(st);
   }
}
Now we have completed all the steps which is required for creating a basic Spring application , When you execute your Main class then we will get below output.
Student [id=123, Sname="Technoname"]
Thanks for reading this article so far. If you like this article, then please share it with your friends and colleagues.
If you have any questions or feedback, then please drop a note.
To explore more about Java you can refer to our other Java Blogs.
Please check most asked programming questions of strings with examples by clicking here, after that you might get a deep knowledge about string operations
For understanding data structures in a easy way you can check this article in our website.
a